The Benefits of an At-Home Manicure
When done correctly, at-home manicures can look just as polished and professional as what you would get from a salon. Not only that, but they also offer plenty of convenience – you can do them in the comfort of your own home, on your own time, and for a fraction of the cost to boot!
At-home manicures are also great for those who have busy lifestyles or simply don’t have the time or energy to visit a salon. With a few simple steps and supplies, you can be well on your way to a perfect manicure that lasts for weeks.
Of course, because of the DIY element of it, it’s important to put in some extra effort and take the time to ensure everything is done right. That’s why we’ve created this guide – to help you learn how to achieve a perfect at-home manicure every time!
Step 1: Supplies Needed to Achieve the Perfect Manicure
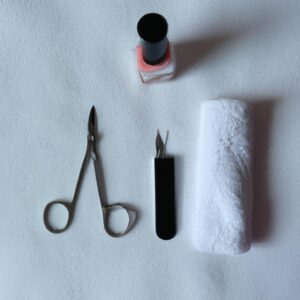
Achieving a perfect at-home manicure is easier than you might think. All you need is a few essential supplies and you’ll be well on your way to creating beautiful hands. Here’s a list of materials you’ll need to get started:
- Nail clippers: These are used to trim and shape the nails to your desired length.
- Nail file: A nail file is used to smooth out rough edges left by the clippers, as well as buff up and shape the nails.
- Cuticle pusher/cuticle trimmer: This tool is used to push back cuticles so they don’t interfere with the manicure. It can also be used to trim away excess cuticles.
- Buffer: Buffers are used to further shape and smooth the nails, as well as add a glossy finish. It can also help remove ridges in the nail.
- Nail polish remover: This is used to remove any old nail polish before applying new. Make sure to choose an acetone-free formula to avoid drying out the nails.
- Base coat: A base coat helps protect the nails and also provides a good foundation for a smooth, even color.
- Top coat: The top coat helps seal in the nail polish and adds shine.
- Nail polish: Choose from a variety of colors and finishes to create your perfect look.
- Cotton balls and Q-tips: These are useful for cleaning up any mess or taking off excess polish.
Choosing the right supplies can make a huge difference in the quality of your at-home manicure. Investing in high-quality products ensures that your manicure lasts longer and looks better.
Step 2: Choosing the Right Nail Polish Colors
When it comes to an at-home manicure, picking the right colors is essential. Not only can the wrong colors look awkward, but they can also take away from the overall appeal of your look. Whether you opt for something that’s bright and bold or muted and subtle, it is important to choose colors that complement each other.
There are plenty of different color combinations that you can choose from. If you’re looking for something that’s classic and timeless, stick with neutral colors like cream, soft pinks and beiges. For a modern twist, try mixing and matching nudes and pastels for a subtle yet chic look. Make sure to use contrasting hues in order to create a visual interest.
If you want to go for something a bit more daring, consider choosing colors that are more vibrant. Bright colors like red, blue and purple can instantly transform a look, adding a bit of fun and excitement to your at-home manicure. You can also pick a set of colors and alternate them between nails to create an eye-catching design.
It’s also important to pay attention to popular trends in nail polish. You can check out fashion magazines or look to celebrities for inspiration. This will help you find the perfect look that is both fashionable and timeless.
Step 3: Properly Prepping Your Nails
Before you can create a beautiful at-home manicure, you must properly prepare your nails. The most important step is to ensure the nails are completely clean and free of debris. Any dirt or oils on the nails will prevent the nail polish from adhering correctly, resulting in an uneven finish and easy smudging.
Begin by using a nail brush to scrub away any dirt and grime that may have accumulated on your nails. Make sure there are no signs of dirt or residue left before moving on to the next step. Once the nails have been cleaned, use some rubbing alcohol or nail polish remover to remove any remaining oil or dirt from the nails. This will provide a smooth surface for the nail polish to adhere.
Now that your nails have been properly prepped, you are ready for the next step in creating your perfect at-home manicure.
Step 4: Applying a Base Coat
Applying a base coat is an important step in achieving a perfect at-home manicure. It helps to protect your nails and provides a smooth surface for the color of the nail polish. Without it, your manicure may end up looking uneven, clumpy, and unevenly pigmented.
Before applying a base coat, make sure to clean your nails with some warm water and a soft cloth. You want to remove any dirt or debris that could otherwise get in the way of the color of your polish. Once you are sure that your nails are free of any dirt or debris, you can begin to apply the base coat.
A brush specifically designed for use with nail polish can be used to apply the base coat. Begin by applying the base coat at the cuticle area, then work your way outwards. Make sure to evenly cover the entire nail before moving onto the next one. This will help ensure that the base coat is applied evenly and will make sure that it adheres properly.
After applying the base coat, give the nails a few minutes to dry. This will help to ensure that the polish can adhere properly and won’t streak or smudge. Once the base coat is dry, you can move on to applying the color of your choice.
Step 5: Applying Color
Now that your nails are prepped, the next step is to apply the polish. This will take some patience and practice to get right, but the end result will be worth it.
When it comes to application, there are a few key tips to keep in mind. Firstly, use thin, even coats of polish. Building up too much polish at one time will lead to an uneven finish. It’s best to apply two or three thin coats of color, allowing each coat to dry in between applications. Secondly, make sure to use the brush to seal the edges of the nail. This will help to prevent any chipping. Finally, it’s important not to overwork the polish. Excess manipulation can cause bubbles or streaks to form on the nails.
Another important tip is to avoid making mistakes as you apply the polish. To do this, here are a few things you can do. Firstly, apply a generous amount of base coat before starting the color. This will act as a protective barrier between any mistakes and your nail bed. Secondly, if you do make a mistake while adding color, try to immediately fix it by using a cotton swab. Thirdly, if you find yourself making the same mistakes over and over again, consider investing in a dotting tool. This can be used to add additional detail and help with more precision. Finally, if you don’t feel confident applying the polish, try using a stencil instead.
Step 6: Finishing with a Top Coat
The top coat is essential in achieving a perfect manicure. It adds the finishing touch, creating a glossy, professional look while protecting the manicure for longer. Some top coats can even make the nail colour dry faster!
Using a top coat also helps to prevent common polish problems, such as chipping, dullness, and smudging. When applied correctly, it seals the colour and prevents any further damage.
There are a few different types of top coats to choose from. Some of the popular options are:
- Glossy – gives a brilliant shine
- Matte – provides a smooth, velvety finish
- Quick drying – dries your manicure quickly
- Long lasting – guarantees long wear time
No matter which type of top coat you choose, remember that all three should be applied in thin coats and allowed to dry completely before applying additional coats. Make sure to apply the top coat evenly over your entire nail and across the free edges to ensure your manicure’s longevity.
Step 7: How to Fix Any Mistakes
Sometimes manicures don’t always turn out perfect, but luckily there are ways to fix any mistakes. Here are some of the most common mistakes and how to address them.
Smudged Nail Polish
If you smudge the polish while it is still wet, use a cotton swab with nail polish remover to carefully clean up the mess. This should help without ruining the whole coat.
Streaks in the Polish
If there are streaks or the polish looks uneven when dry, add a second coat. Make sure the first coat is completely dry before adding the second one. This can help even out the color and make it look more professional.
Polish on Skin
To fix this, dip a cotton swab in nail polish remover and gently remove the excess polish from your skin. Do not rub harshly, as this may cause the polish to come off from the nail as well. Alternatively, you can use a cuticle pusher but be extremely careful as it is sharp.
Chipped Nail Polish
To fix a chipped nail polish, apply a thin coat of clear polish over the chipped area. This should help the chip blend in with the rest of the nail. Once the clear coat is completely dry, add another coat of the colored polish.
Step 8: Nail Art
Creating fun nail art looks is a great way to bring out your creativity and personalize your manicure. While it may look intimidating, there are many simple designs you can do at home that don’t require too much skill.
Painting on intricate details with a nail art brush is the best way to achieve complicated designs. With patience and practice you can make amazing designs. However, if you’re just starting out, there are plenty of simple ways to spice up your at-home manicure.
One of the easiest ways to add an extra layer of fun to your nails is with stamping. This is a simpler version of freehand painting. Instead of painting on intricate details, you use a specialised stamper tool and stickers to create the design. They come in a variety of patterns and colors, so you can mix and match for unique nail art.
You can also add decorations to your nails using rhinestones or other 3-D decorations. You can pick these up from many craft stores or beauty supply shops. To apply them, first apply some clear nail polish over your chosen design and wait for it to dry. Then simply stick the rhinestones onto your nails with tweezers. Finally, seal the design with another layer of clear polish.
By following these tips, you can easily create eye-catching nail art designs right from your own home!
Step 9: Clean Up After Yourself
After all the work you’ve put in to achieve a perfect at-home manicure, the last thing you want to do is wreck it. Cleaning up your workspace and disposing of used materials is important to ensure your mani stays looking like a professional job. Here are some tips for cleaning up your nail station.
- Gather all of your nail supplies and workstation items. Make sure you have everything you need.
- If you were using a cotton ball, dispose of it. You can use a cotton pad for the next time you give yourself a manicure.
- Discard any used cotton swabs, such as the one you used to remove excess nail polish around your cuticles.
- Throw away empty nail polish bottles.
- Wash out your nail bowl if you used one and allow it to dry.
- Wipe down your workstation with a damp cloth and dry it off afterwards.
- Check the floor for any potential spill clean up.
- Organize and store any unused nail polish, polish remover, and nail tools.
These simple steps will help keep your workspace clean and organized and prevent any accidents or mishaps that could ruin your hard work.
Step 10: Tips for Caring for your Manicure
You’ve put in the hard work and now you have an amazing looking manicure – so how do you make sure it lasts? Here are some tips to help ensure that your at-home manicure lasts as long as possible.
- Avoid contact with water for at least two hours after completing your manicure. This will ensure that your nails are completely dry and free of any smudging.
- Apply a good quality cuticle oil every day to keep your nails moisturized and strong. Cuticle oils are fairly inexpensive, and can be found at most drugstores.
- Wear gloves when doing any household cleaning or gardening to protect your nails from harsh chemicals.
- Reduce contact with water by wearing rubber gloves or covering your hands with plastic wrap while washing dishes, cleaning or showering. This will keep your manicure from softening and early chipping.
- Trim your nails regularly to keep them from becoming too brittle or weak.
- Always use a base coat before applying nail polish, as this will keep your nails protected from discoloration.
- When it’s time for a new manicure, use a nail polish remover that is free of acetone. Acetone can damage nails and dry out the skin around them. Instead, look for non-acetone removers which will still provide superior results.
Following these tips will help you maintain a gorgeous manicure for longer than you thought possible. And don’t forget to always treat yourself to regular manicures and pedicures!
Achieving a Perfect At-Home Manicure
Achieving a salon-quality manicure at home can be easier than ever with the right knowledge and tools. With the right supplies, you can achieve a professional look that won’t break the bank. Here are the steps to follow for a perfect at-home manicure.
Step 1: Supplies Needed to Achieve the Perfect Manicure
Before you start your manicure, it’s important to make sure you have all of the necessary supplies: nail polish remover, cotton pads and balls, cuticle pusher and trimmer, base coat, nail polish color, top coat, nail art supplies (if desired) and a small bowl of warm water. Nail polish remover is used to remove any existing polish for a clean surface. Cotton balls or pads are great for getting the job done. A cuticle pusher and trimmer are beneficial for pushing back your cuticles. A base coat will help your nail color adhere and stay on longer. Choose a shade of nail polish and a complimentary shimmer or glitter for your highlight nail, if desired. Finally, a top-coat will seal your work and give your nails a glossy finish. Pick up some nail art supplies if you want to make your manicure unique.
Step 2: Choosing the Right Nail Polish Colors
When choosing the right colors for your manicure, there are a few things to consider. For most people, classic shades such as reds, pinks, and purples work well. If you are looking for something bolder, you could try out one of the season’s popular trends. You can also experiment with complimentary colors like pink and green or red and silver for a unique look. And don’t forget about accent nails where you can go wild with nail art.
Step 3: Properly Prepping Your Nails
Before you begin painting, you’ll need to make sure your nails are properly prepped. Start by washing your hands with soap and water. Gently push back your cuticles with a cuticle pusher. Trim away any extra skin with a cuticle trimmer. Use a nail file to lightly buff the surface of your nail. Finally, apply a few drops of nail polish remover to a cotton pad and wipe away any dirt or oils that may be on your nails.
Step 4: Applying a Base Coat
As mentioned before, a base coat is an important step in achieving a long-lasting manicure. It helps the nail polish adhere better to the nail and prevents it from chipping or flaking off. Apply a thin layer of the base coat and let it dry for a few minutes before moving on to the next step.
Step 5: Apply Your Color
Now it’s time to add the color! To ensure even application, start by applying a thin layer of polish from the center of your nail outwards. Keep the brush strokes in a single direction and use light pressure when brushing it on. Let the first coat dry for a few minutes before adding a second one. You may need to add a third if the color is still not how you want it.
Step 6: Finishing with a Top Coat
To add shine and protection to your nails, apply a top coat after the polish has completely dried. There are various types of top coats available, such as matte, glossy, and textured. Try out different ones until you find a finish you like. Make sure to apply the top coat slowly and carefully to avoid bubbles.
Step 7: How to Fix Any Mistakes
No matter how careful you are, mistakes do happen! Luckily, there are ways to fix these oopsies. If your nail polish is still wet, you can grab a Q-tip dipped in nail polish remover and lightly rub away the mistake. If the polish has dried, you can use a small brush to apply a fresh coat of polish over the mistake. Be sure to use light strokes and let it dry before adding any more layers.
Step 8: Nail Art
If you’re feeling creative, you can add some fun nail art to your manicure. Popular designs include ombre, animal print, and French tips. You can purchase
comments: 0